Setting up your own nameservers, such as ns1 and ns2, for a domain registered with OVH can seem like a daunting task. However, with the right approach, it becomes manageable. This guide will walk you through the process, especially if you have a VPS or dedicated server, either with OVH or another hosting provider. Here’s a trick to simplify the process.

Step-by-Step Guide
- Log in to Your OVH Account: Begin by logging into your OVH account. This is your control center for managing all your OVH services, including domain names and DNS settings.
- Navigate to Your Registered Domain Name: Once logged in, go to the section where your domain names are listed. Select the domain name for which you want to set up custom nameservers.
- Access the DNS Zone: In the domain management interface, find and select the DNS Zone option. This is where you can manage all DNS records associated with your domain.
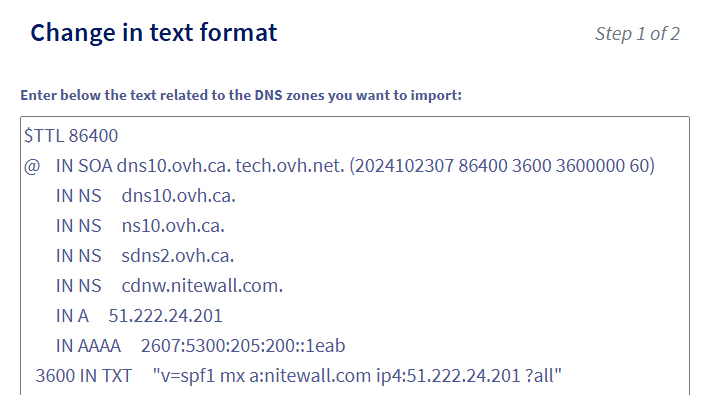
- Change to Text Format: On the DNS Zone interface, look for an option that says “Change in text format.” This feature allows you to edit your DNS records in a more flexible and detailed manner.
- Replace Default Nameservers: OVH provides default nameservers, such as “ns10.ovh.ca.” In the text format editor, locate these default nameservers and replace them with your own custom nameservers (e.g., “ns1.yourdomain.com” and “ns2.yourdomain.com”).
- Confirm Changes: After making the necessary changes, click on the next button to proceed. Confirm your changes on the subsequent screen. This step is crucial to ensure that your new nameservers are correctly registered.
- Wait for Propagation: DNS changes can take some time to propagate. Typically, this process can take anywhere from 5 minutes to 24 hours. In many cases, you might see the changes take effect within just a few minutes.
Why Use Text Format?
Using the “Change in text format” option is essential because manually adding nameservers through the “Add an entry” option often requires a subdomain. This can complicate the process and result in entries like “subdomain.domain.com,” which is not what you want for your primary nameservers.
Additional Tips
- Ensure Correct IP Addresses: When setting up your custom nameservers, make sure you have the correct IP addresses for your VPS or dedicated server. This ensures that your domain resolves correctly to your server.
- Check DNS Propagation: Use online tools to check the propagation status of your DNS changes. This can help you verify that your new nameservers are correctly set up and resolving globally.
- Backup DNS Settings: Before making any changes, it’s a good practice to backup your current DNS settings. This way, you can easily revert back if something goes wrong.
Conclusion
Adding custom nameservers to your OVH registered domain might seem challenging at first, but by following these steps, you can accomplish it smoothly. Remember, the key is to use the text format option for editing your DNS records. This method bypasses the limitations of the manual entry method and allows you to set up your nameservers without the need for subdomains. With patience and careful attention to detail, your custom nameservers will be up and running in no time.
